Archive for June, 2014

Trad DIY: How to Hem pants with a Cuff

With a box of unhemmed chinos staring at me for well over a month I finally broke down and decided to something about it. My dry cleaner takes at least two weeks to turn this around. My tailor takes one week, but he is an hour away. So that something turned out being learning how to hem them myself …with a cuff.

My first step was to learn how cuffs were constructed. I could have searched the internet for the perfect answer, but having a few pairs of chino with cuffs coming apart on their own I just looked at how they were constructed.  That is all to say fair warning. There may be better methods out there.

Here is the formula that arrived at:

X” for cuff
+
X” for cuff
+
1” for hem
+
.5” to turn under
Amount of material required

I wanted 1.5″ cuffs.
My formula looked like this:

1.5” cuff
+
1.5” cuff
+
1” for hem
+
.5” to turn under
4.5” of material
Sewing Starter Kit
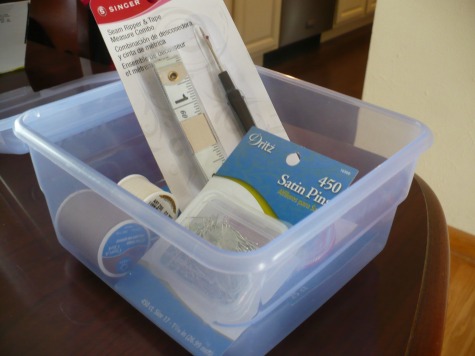
Next, I had to get the proper tools. Luckily my mom who has helped me out of more than one sartorial jam with her alteration skills agreed to help. She put together a  simple sewing kit for around 10 dollars. This kit included everything (listed below) that I would need to hem my pants. She also volunteered her tutelage for the sewing portion of the project. A big thank you goes out to her for the help!

Tools required:

  • Chalk
  • Needles
  • Thread
  • Pins
  • Seam ripper (I didn’t need this, because my chinos were unfinished.)
  • Measuring tape for cloth
  • Thimble

Creating the Cuff

  1. Mark chinos at desired length for wearing (if the pants are not unfinished like the ones I began with this is where I recommend letting the hem out.)
  2. Measure down X inches of material that is required for desired cuff size
  3. Double check measurement
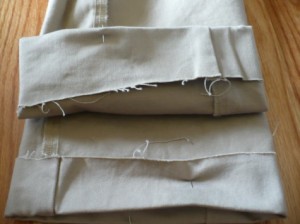
  4. Cut off excess material
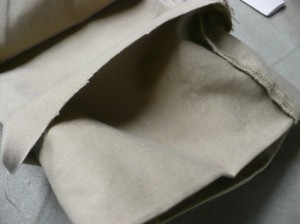
  5. Fold material up toward the outside by the amount of material that you added for the cuff (see bel0w)
    Turning chino cuff up
  6. Iron material
  7. Fold the material down toward the bottom of the pants. The material will now pass the bottom of the pants by 1.5”.
  8. Iron material
  9. Turn the material inside of the pants by 1” and iron. You will now be able to see what the finished pants will look like.
    Cuff
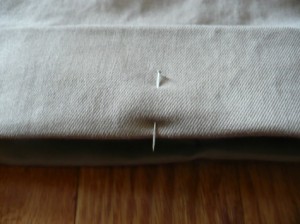
  10. Pin the bottom of the cuff. I would put at least two pins in. One on each size.
    Pinning Cuff
  11. Turn the pants inside out
    Turn inside out
  12. Turn .5” of the extra material down behind this material
  13. Iron the material
  14. Take a break

Hemming the Cuff

  1. Thread the needle with 2-3 ft. of thread and tie a knot at one end of the thread
  2. Now we are going to start sewing. Take the needle and place it through the extra material pulling the know so that it will get stuck
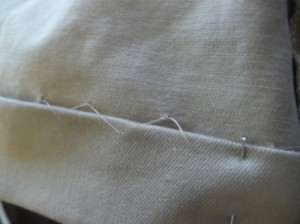
  3. Next run the needle through a little bit of the main chino material.  You don’t have to worry too much about the thread showing because we are sewing low enough that it the cuff will cover our marks. See the picture below to better understand the sewing method I described.
    Sewing Cuff
  4. Continue sewing like this until you get to the other seam
  5. We will now attach the top portion of the cuff to chinos so that they are secure
  6. Push the needle through to the outside of the pants
  7. Next going back and forth between the inside of the cuff and the main leg of trouser 4-6 times so that the thread is not visible
  8. After attaching the top portion of the cuff to the chinos push the needle back through into the inside of the chinos.
  9. Knot the thread and pull tight the thread tight so that you have enough thread to keep sewing
  10. Continue to sewing as you were in Step 3 until you come to the seam on the other side
  11. Repeat Step 7
  12.  After completing Step 7 add 2-3 knots and then cut off excess thread
  13. Enjoy your freshly cuffed and hemmed chinos!

Finshed Pants
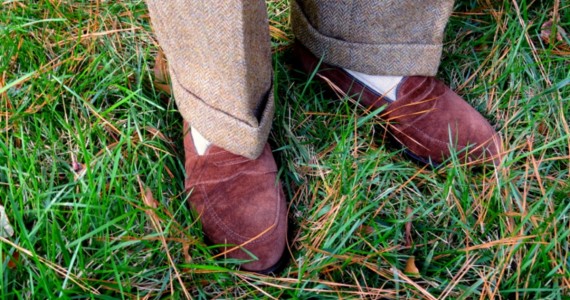
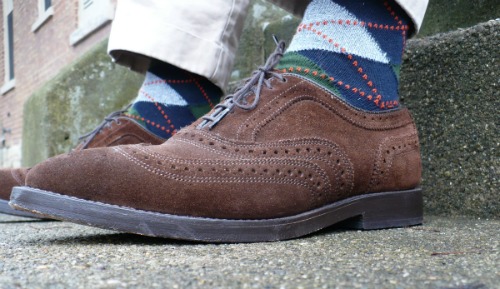
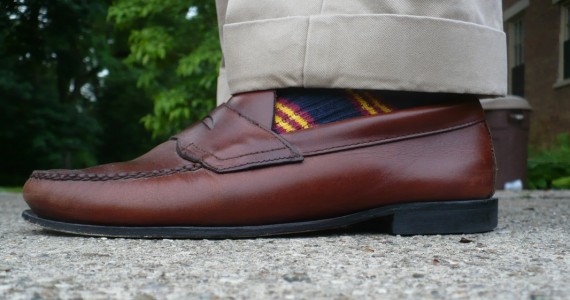
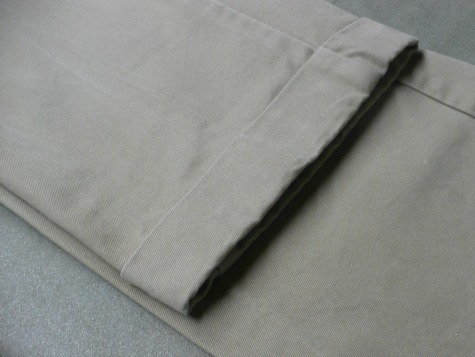
Finished Product (Undisclosed Chinos)

Learning how to hem pants may be one of the most useful skills that I have learned. I feel liberated. No longer am I dependent on my tailor or the dry cleaner to hem a pair of trousers and the timeline to turn them around is now up to me. Plus, I save $20 for every pair that I hem myself. If you have any question about the process please don’t hesitate to ask. While creating this post I learned just how challenging it can be to write step-by-step directions.

Billax’s made up rules for TNSIL apparel – Shoe impact

This post is a reprinting of a post on a forum that is frequented by Billax. Billax is not only one of my style role models, but a friend and a man that was Trad back when it was called Ivy League.

Hypothesis/Justification for trousers – cuff/no break and tapered leg casual pants.

I’ve worn the cuff/no break (see here: Cuff, no break)look for 56 years. I’ve also worn tapered-leg-opening casual pants for the same number of years. It’s a deeply ingrained preference for me, but can one work backward to an analytic justification for that look? Maybe.

I’ve been speculating on a set of principles that might/could justify the “look” of the pants I’ve worn so long. I’m at a point where I’ve stopped grinding on it, so I am writing it up to have thoughtful guys tear apart my principles and reasoning. Here goes:

There is one practice I always follow. If you can’t buy in to it as part of this thought experiment, what follows will make little or no sense. Here’s my practice: When standing, while wearing a jacket and tie, I button my jacket, except when wearing a vest or waistcoat. This practice (right or wrong) comes from my principles (up until recently completely inchoate)

Here are my three rules:

1) In TNSIL Men’s apparel all cinches, closures, and adjusters are invisible when standing.

2) In TNSIL Men’s apparel all ornamentation is exposed when standing.

3) When rules 1 and 2 are in conflict, rule 1 takes precedence.

So, what are cinches, closures, and adjusters? Firstly, they are NOT the top layer of apparel. Here’s a partial list:

  • arm bands to adjust sleeve length
  • braces
  • belts
  • shirt buttons
  • tie bars (when used exclusively for promoting tie arch and verticality)
  • shoe laces

All the above serve to organize, adjust, and hold the relative positions of one’s garments. They are not seen by others during business, professional, or formal settings.

Now, what are ornaments?

  • cufflinks & studs
  • Tie Bars that express one’s interests or have a ornamental design element
  • Tassels, horse bit, or penny straps on loafers
  • Lapel pins

 All the above are designed to attract the eye

Issues that come up with my hypothesis:

  1. Shirt buttons are not covered by a bow tie. While I am not a bow tie wearer, I am a Bow tie fan.
  2. Monogrammed and otherwise fancy belt buckles are ornamentation on belts. When standing, while wearing a jacket and tie, a buttoned jacket with TNSIL rise trousers won’t show the ornamented buckle. (Rule 3)

Now, getting to trouser length and leg opening taper, here are side views of a classic dress shoe and a classic loafer. It is not necessary to like or dislike these shoes in order to make my point.
Dress Shoe 1Tassel Loafer 1

I’ll add a black rectangular overlay to represent trousers as they touch the dress shoe and the loafer.

First, a very dressy captoe – Allen Edmond’s Park avenue. To meet Rule 1, the leg opening must cover all the shoe laces on this 6 eyelet shoe. This shoe widens the required leg opening, and because of the high quarters on dress shoes, exposes no sock.
Blocked Dress ShoeSecond, an ornamented loafer – Allen Edmond’s Manchester. To meet Rule 2, the trouser leg must be both more narrow and sit a bit higher on the shoe. In addition, the low quarters on loafers will expose a little sock at the requisite height for ornamentation to show.. Whether the ornamentation on the loafer is a penny strap, a horse bit Gucci, or a tassel, the same result occurs – trou are narrower and sit higher on the shoe when wearing the more casual shoe.
Blocked LoaferException 1: Monk Straps and double Monk straps require trousers to drape lower on the shoe than any other footwear, so as to not violate Rule 1, which states that all cinches and closures must be covered when standing. No getting around it, monk straps are problematic for the TNSIL guy. Maybe that’s why I have never owned a pair.

Exception 2: Venetian loafers have no ornamentation and no closures, thereby having no min/max point for trouser height or width. Fifty-two years ago I bought my first (and only) pair of Venetians. I could not make them look “correct” with trousers of any height or width. That was the first time I ever thought to myself that, “There should always be some natural suggestion as to the relationship between apparel elements.” Still think that.

So, loafers with their ornamentation and lower quarters look best with a slightly narrower leg opening and sit slightly higher on the shoe. Laced dress shoes require trousers with a slightly wider leg opening sitting a little lower on the vamp. Socks will show with ornamented loafers, given their lower quarters. Socks will not show on dress shoes. THIS IS A DESIGN FEATURE, NOT A DEFECT. Any way, that’s my story and I’m sticking’ to it!

 Thoughts?

PSA: Allend Edmonds Shoe Bank Website

The once mythical Allen Edmonds Shoe Bank where deals were rumored to be unparalleled has now transcended trad lore and manifested itself as a website (Shoebank.com). I first became aware of the Shoe Bank from an employee at the Allen Edmonds factor outlet not too far from my home. I was looking for a discontinued style and the employee said they would look at the Shoe Bank for it. While they didn’t Allen Edmonds Shoe Bankhave the shoe the employee had the Shoe Bank send me a list of everything that they had in my size. My eyes where opened.

The original Shoe Bank was a retail store located in Wisconsin where factory seconds, discontinued, and closeout styles were sold. This is where the legend originated. Visiting the physical store in Wisconsin was not the only to get access to this stock. Prior to the new website emailing the Shoe Bank was how us trads accessed the stock from afar.

The new Shoe Bank site also functions as online factory outlet.  I have always felt lucky to have Allen Edmonds factory store near me. They primarily sell seconds with the occasional closeouts and discontinued styles mixed in. 99% of the time I have not been able to identify why the shoes are labeled seconds which speaks to the standards that Allen Edmonds has in place.
My Allen Edmonds Shoes                                                                    A pair of my Allen Edmonds seconds

At first I was a bit unconcerned that this new website would lead to a depletion of stock. However, the fact the new site is not an e-commerce site made me feel a little better. This means that there is still some leg work that is required customers which may deter a few would-be customers. If you see something in your size that you want I would encourage to act quickly before someone else does.

Critter Crazy

Sometime fun needs to be had and when you are in fun mode sometimes you need clothes to communicate that to others. There are few better ways to do this then by wearing a pair of pants or shorts emblazoned with critters. I am sure that most of you are familiar with these items and where to get them (pretty much anywhere). You can find them at Brooks Brothers, Lands’ End, J.Crew, and of course Castaway Clothing, but I found a new source the other day.

SSEW formerly known as English Sportswear has been producing clothing for over 50 years. What made them stand out from the sources that I mentioned above is that not only do they offer a wide range of fabrics such as seersucker, twill, poplin, and cords, but they also have a few critters to choose and while the selection could be larger the fact that they can be embroidered with your choice of thread color helps increase the options. The icing on the cake is that they will do custom critters (Basically they are to critter pants what Leather Man is to critter belts). You can send in your own artwork and they will turn it into stitches for a onetime fee of $30 (4-6 week turnaround). Their prices are very reasonable, too. Pants cost $90 and shorts $75. Shorts receive up to 24 embroideries and pants 48. Pants are also available in slim fit.
SSEW Emroidery ChoicesI have been trying to think up a few fun combos. I know that I would get the most use out of a pair of shorts, but a pair of seersucker pants in say lime green or pink seersucker with contrasting embroidery could be really really fun, especially on vacation. I am trying to push myself out of my comfort zone, but even blue seersucker pants would get me there.

One last thing, the site is a little dated looking, and while I have never ordered from them I have heard positive things from those who have. Let your imagination run wild and go critter crazy.

Shantung Summer

Shantung Summer

As the weather changes so does our wardrobe and many of us look forward to these transitions, but. “look forward to” may be an understatement when it comes to warm weather wear. Clothes horses everywhere begin salivating over madras, seersucker, and linen as Memorial Day (The official first day for these fabrics) draws near. However, there is one summer fabric that doesn’t get nearly as much attention as the others. This fabric is Shantung Silk.
Shantung tie                                                                   My one and only Shantung Tie.

What is Shantung?
Shantung ties get their name from, yep, you guessed it: The Shantung Province of China. Shantung silk is made from raw silk and was traditionally woven from uneven pieces of yarn. The result is a very textured slubby silk that is perfect for warm weather tie wear. Learn more over at Gentleman’s Gazette.

Who sells them?
Sometimes I think that I drop the same names again and again (J.Press, Brooks Brothers, O”Connell’s, etc) when I am guiding readers to products. This time I tried to switch it up a little bit (, just a little bit.).
PRL Shantung Silk Tie PRL Argyll & Sutherland Shantung TieThe first Shantung ties that caught my eye are over at Ralph Lauren (above and here). While RL is no stranger to those interested in traditional American clothing they are often overlooked by the Trad crowd, because of their use of logos and their image as a bastion of all things preppy. However, I suggest keeping tabs on them. Especially for ties. Uncle Ralph’s Shantungs come in at 3” (A tad slim for some.) and they only offer 3 striped variations, but two of them were so well executed that they are definitely worth a look.
Drakes Shantung Regimental Tie Drakes Shantung Regimental TiesMy Second recommendation for sourcing Shantung ties is Drake’s of London (above and here). Drake’s has an impressive number of attractive Shantung offerings such as regimentals, dots, and solids. These ties are 8cm (or 3.14962 inches) which a touch wider than the PRL ties, but they are also about $70 more expensive than the PRL ties. What I like most about their selection is the number of muted colors (like tie #1) that say summer without yelling it.

The next time you are stocking up on summer staples think about picking up a Shantung silk tie. These slubby ties pick up where your tweeds left off adding texture to your summer rigs. Whether you go with my suggestions above or hit up the usual suspects a Shantung tie is a great way to bring a piece of summer into the office without screaming GTH.